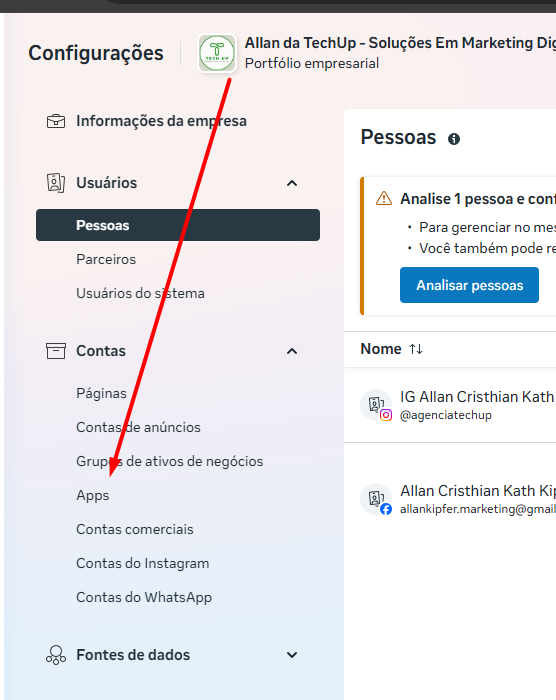
First, go to business.facebook.com, click on the account icon on the left, click on your portfolio, wait for the page to load. Click again on the portfolio, above it, more to the right tap the gear icon. See image 1.
Image 1

Now, after the business settings page loads, click on Apps. See image 2.
Image 2
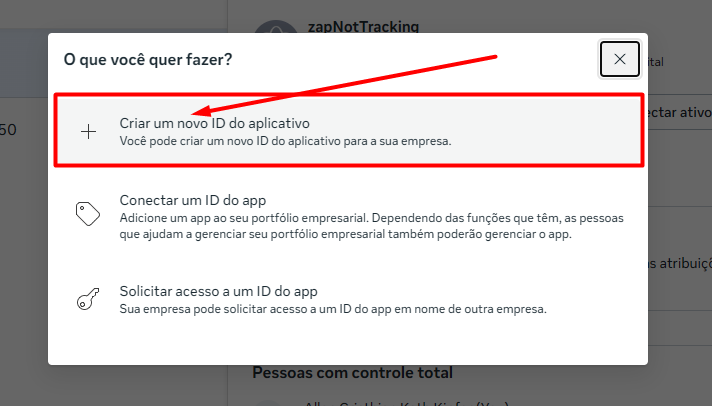
Once the page loads, click on add, see image 3.
image 3

Now, in the modal that pops up tap on 'Create a new app ID'. See image 4.
Image 4
By clicking here, you’ll be taken to the developers area. You’ll need an active developer account, and if you don’t have one, you can create it by tapping on create on the right side of the screen. Once the account is created, go back to the step in image 4
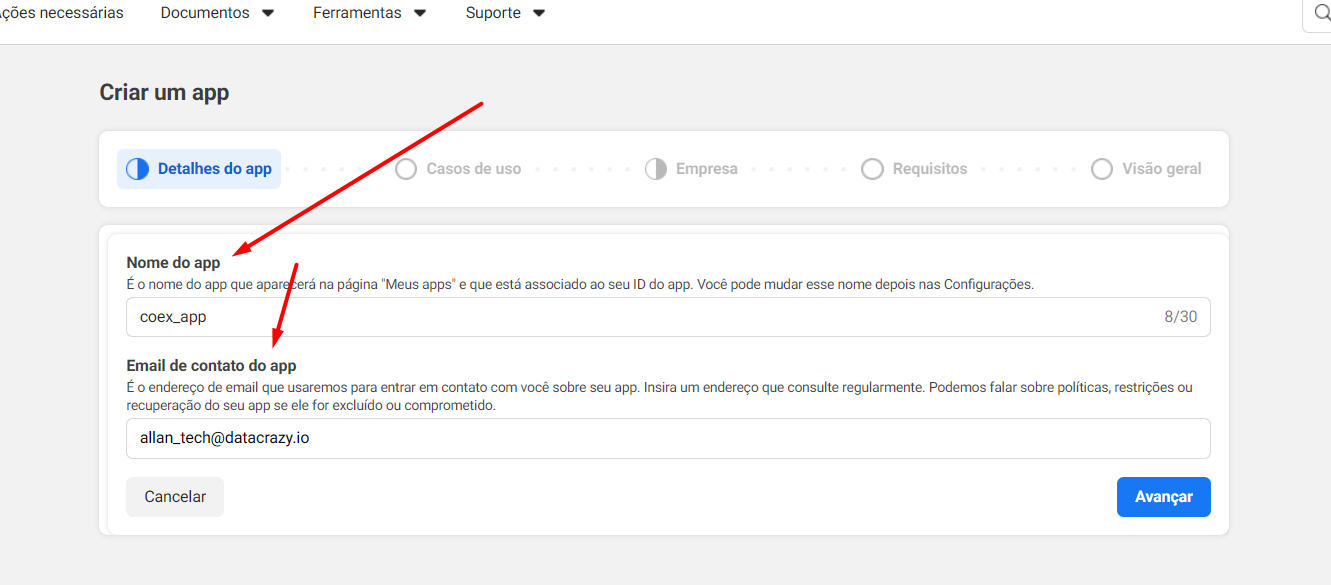
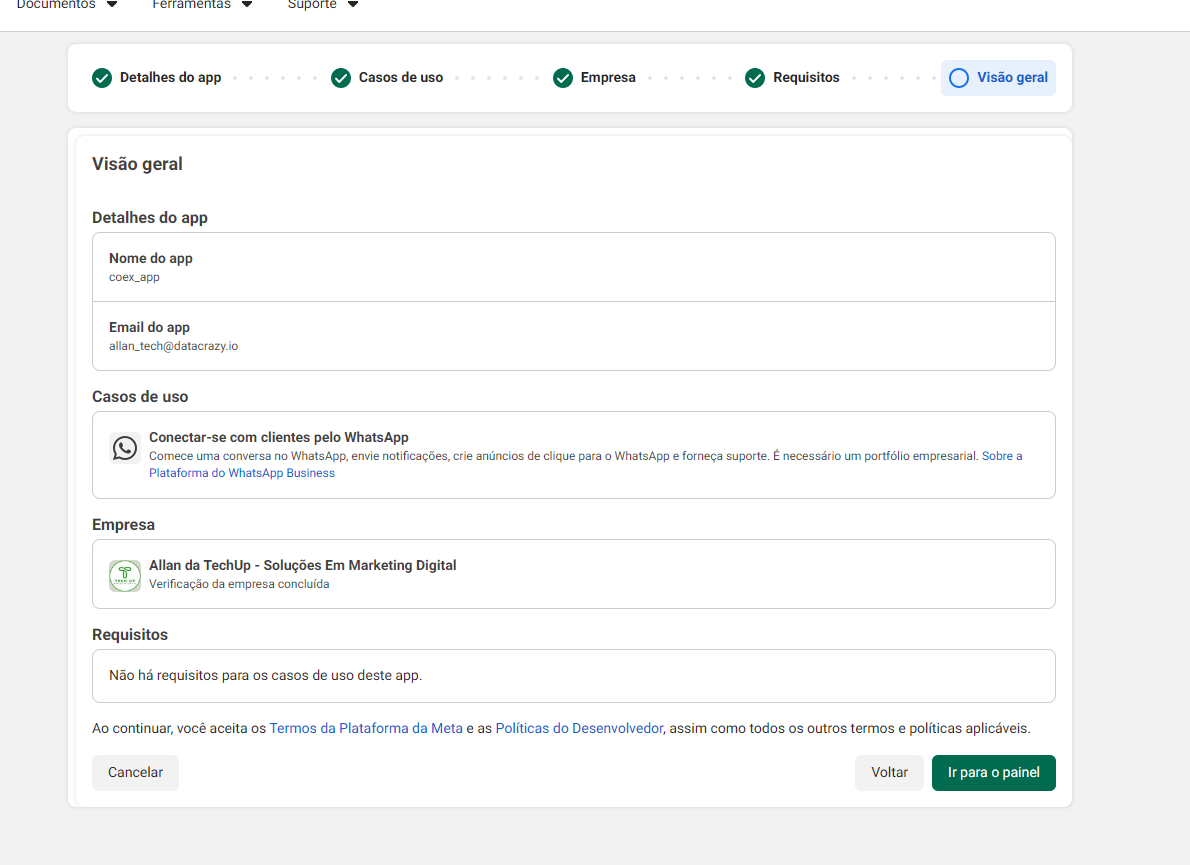
Name the APP and add the official contact email for internal use with/by META. After filling it out, continue. See image 5.
Image 5
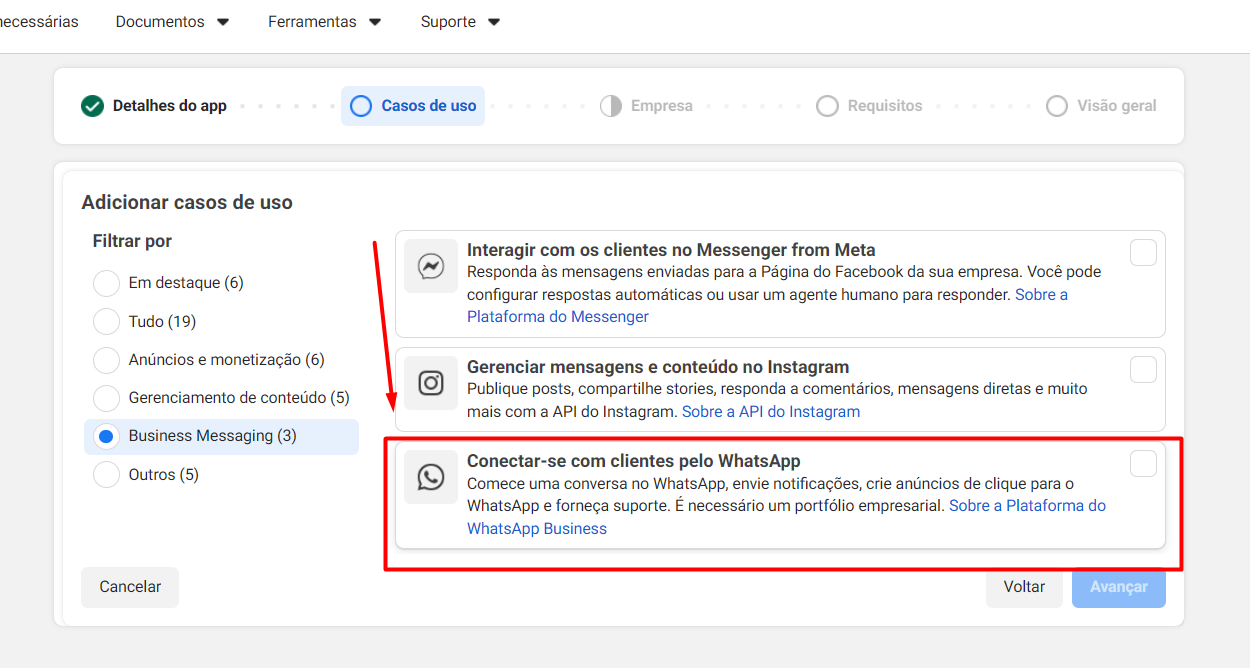
On the next page we choose the use case for this app. For this case, we used 'Connect with customers through WhatsApp'. Continue! See Image 6.
Image 6
Select which portfolio will OWN this app and move on.
In this new step, if you don’t have any pending requirement, just click the blue Next button below.
With everything set, just move on one more time, now we’ll go to the app dashboard. See image 7.
image 7
Confirm your password and move on! Wait for the app to be created. You’ll be taken to its dashboard.
On the dashboard screen, there will be two tasks to do: add the privacy policy URL and use cases. We’ll do the first one, the privacy policy URL. Click this option to add all the privacy URLs, terms of use, and data deletion option.
You need to provide the URL on your site for fields 1, 2 and 3. See image 8
Image 8 }]},{
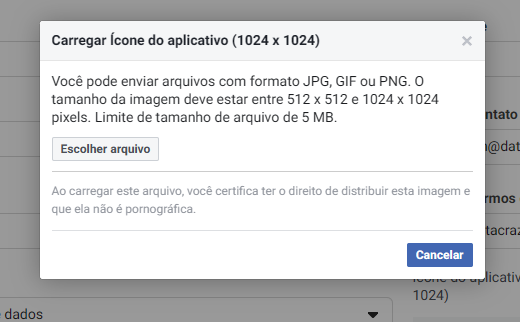
You also need to send an app icon by clicking the image below item no. 2.
Pay attention to the icon requirements, described on the screen itself. See Image 9.
Image 9
Below, fill in all the address information.
Save!
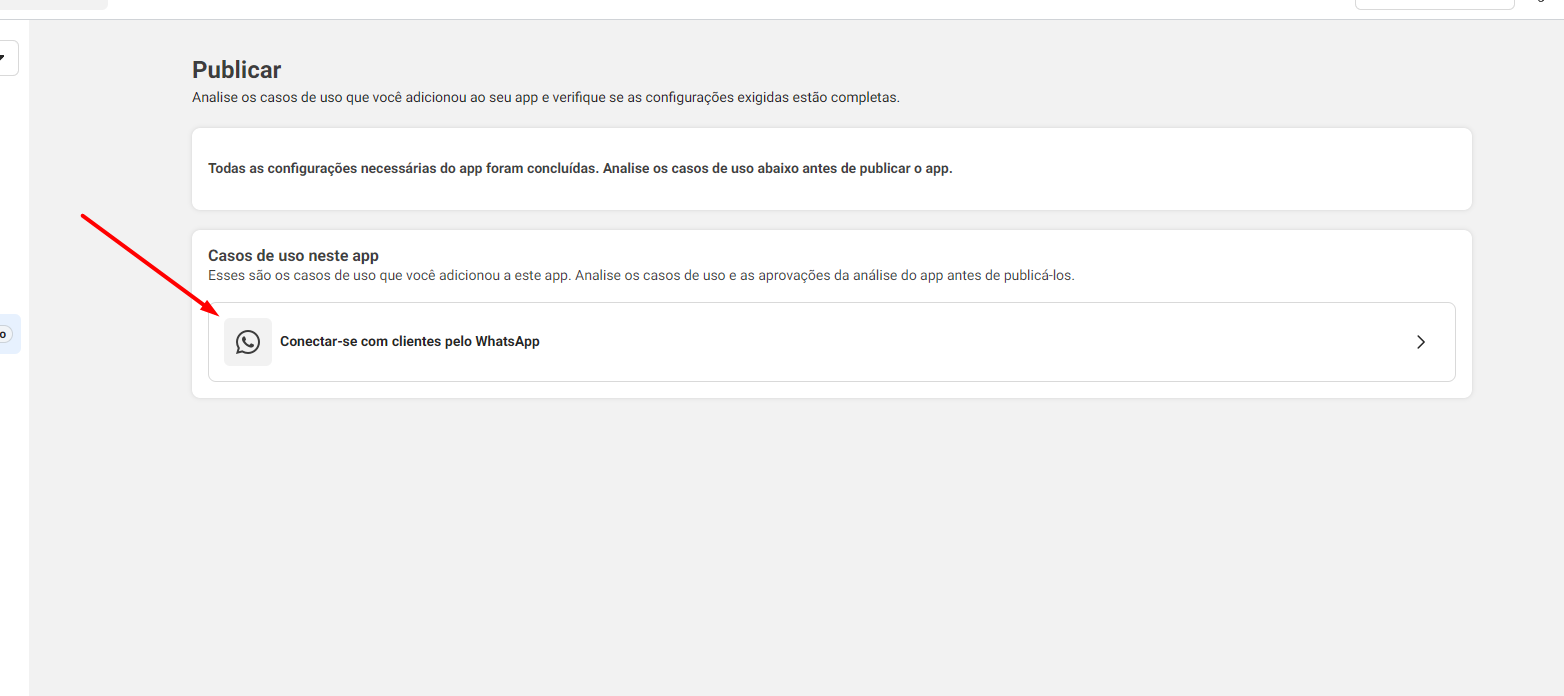
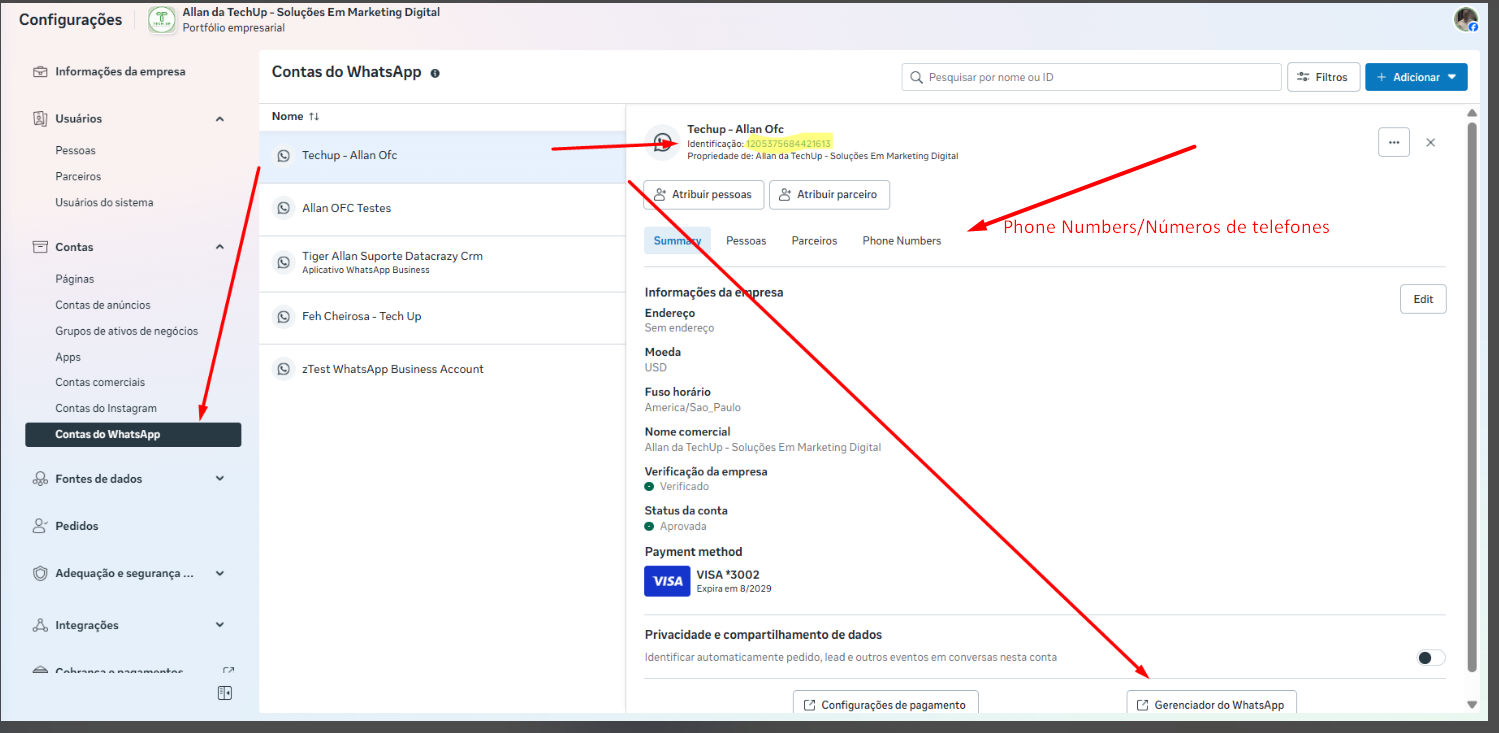
Again in the 'Publish App' menu, we have this screen, we’ll click on Connect with customers via Whatsapp See Image 10.
Image 10
ATTENTION It may be that if your account is more recent it has a different look, your number might be somewhere else and not in the next step, because what’s showing now might just be the test number. This is not the info we need, since it’s META’s test number. If your number shows up there, then yes, select it and then we’ll have our WABA ids and phone ids.
See Image 11, in the rectangular highlight select your number or add it if there’s an option to add it there.
With your number visible here, copy and save the phone number id and the whatsapp business account id.
If your phone number is not here, you can
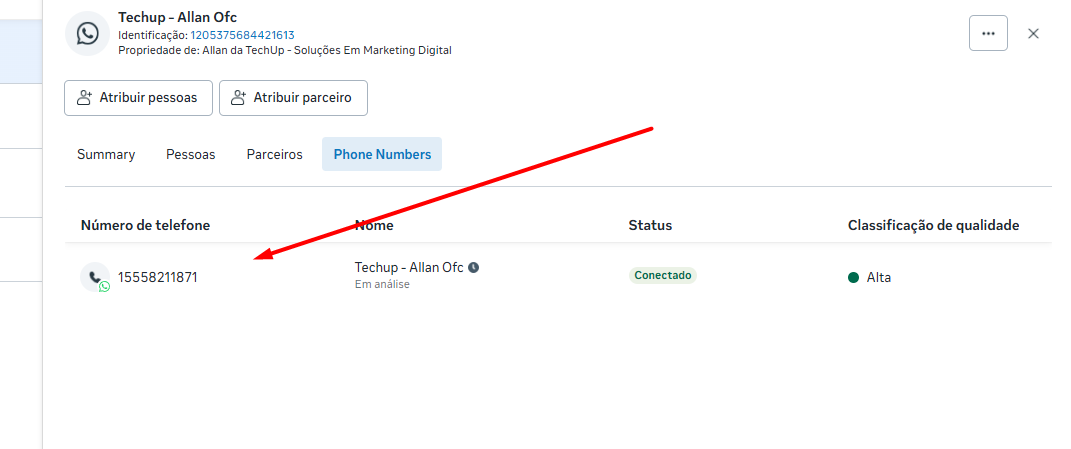
create it right there if the option shows up. Follow the steps. Image 11. If it’s not your number and you can’t create it there, check Images 11B, 11C and 11D to get the waba id and phonenumber id (phone number id). Save them in a safe place to use next!
Obey the rules for the Display Name. Check the rules in this link
After having your phone confirmed. In the "FROM" option, select it. See image 11
Now below it you’ll have the values you saved for id phone number and id WhatsApp Business account, save both in a safe place.
Image 11
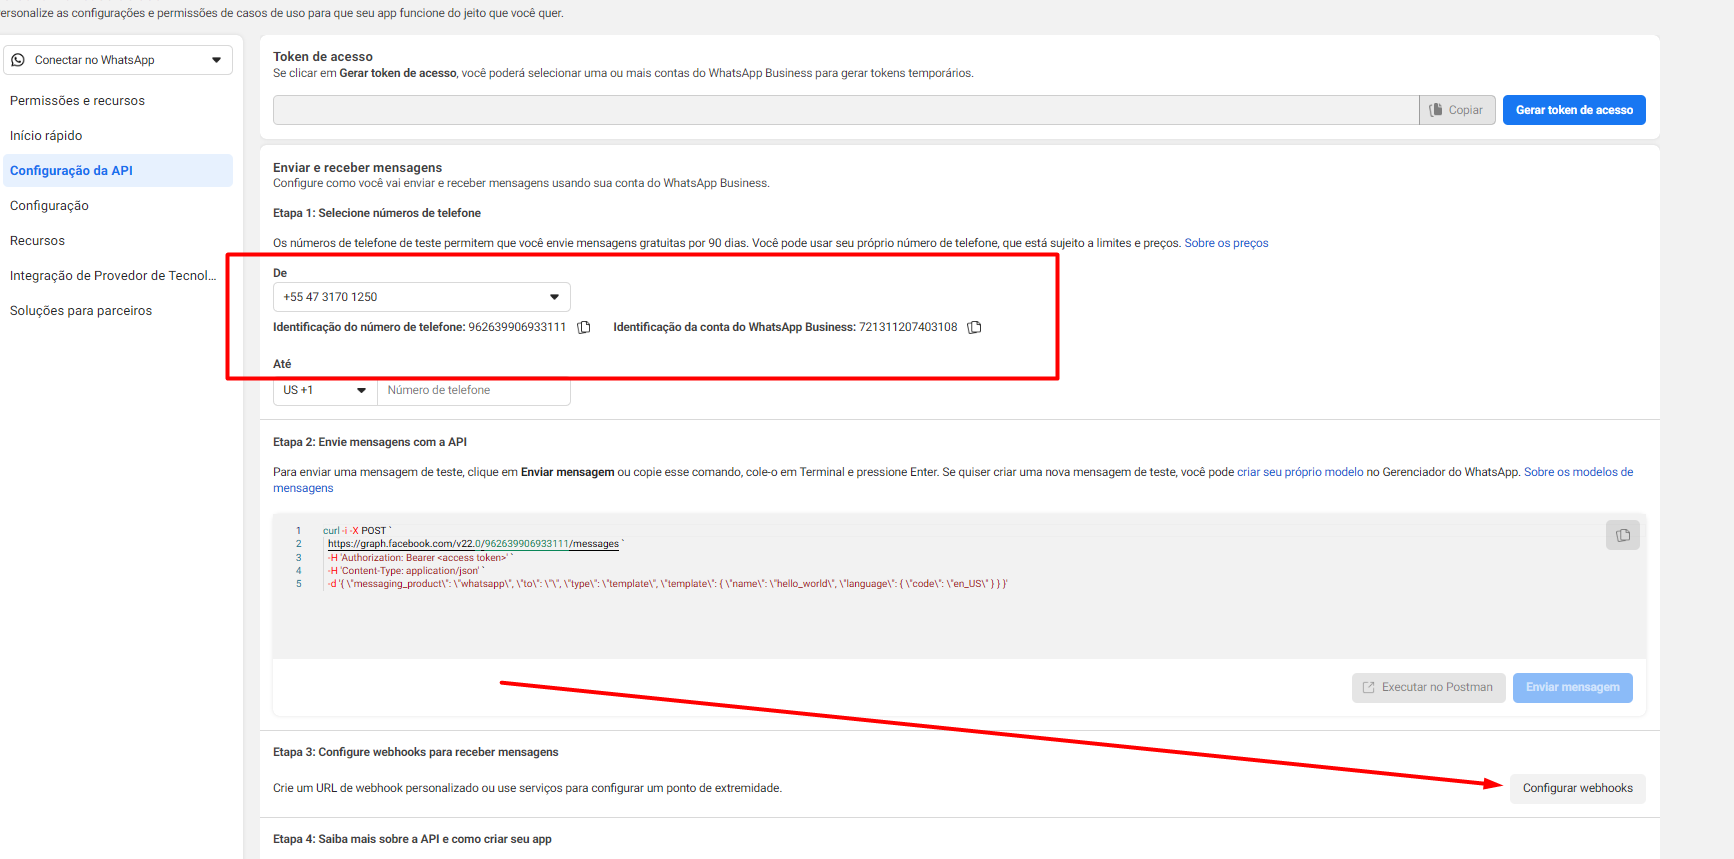
Image 11B - You’ll find the same section where we previously found System Users earlier, but further down, in WhatsApp Accounts.
Select the correct account (you can check the number by going to Phone Number, see Image 11B and 11C).
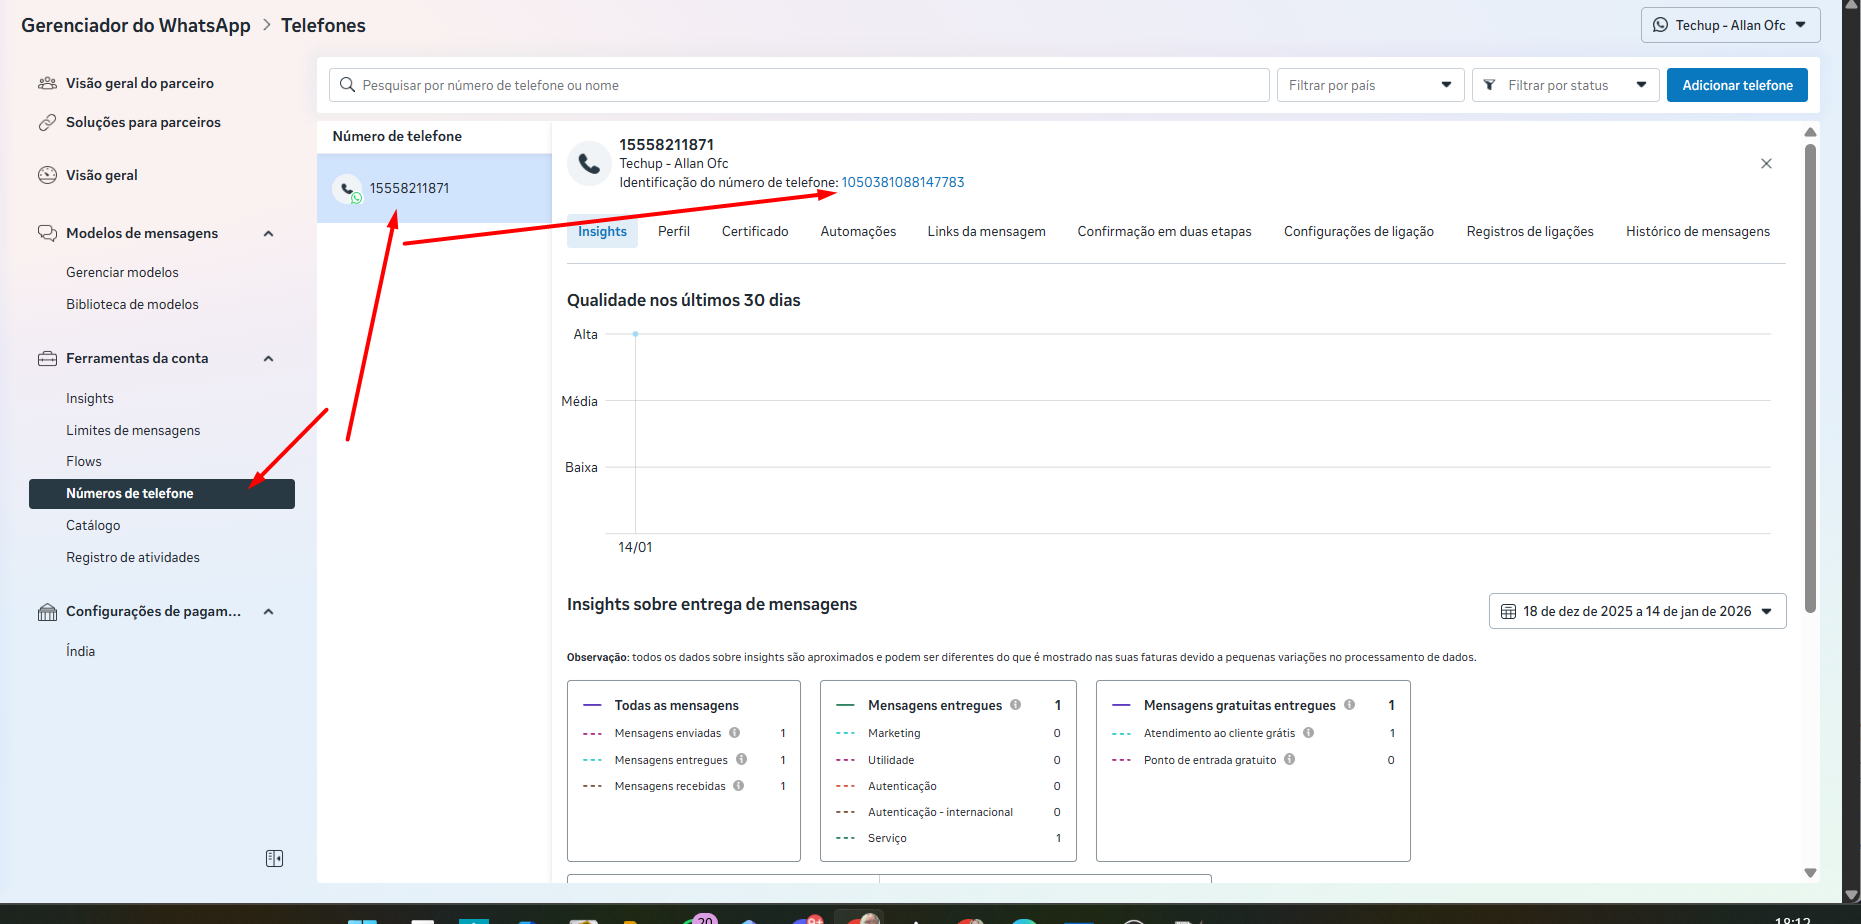
Image 11C
Waba ID is on this screen, save it in a safe place as wabaID.
Now you just need to get the phonenumber id, see in image 11B, tap on WhatsApp Manager, follow the steps in Image 11D.
Image 11D - WhatsApp Manager screen. If you have more than one number, select the correct one, by clicking on it, it will open and show its ID as marked in image 11D. Save it in a safe place as the phone number id.
Now, with the data in hand and safe, let’s set up the webhook. Look at Image 11, in the bottom right corner the Configure Webhook button. Tap it.
Click this link to open Meta business manager. Make sure you’re in the same portfolio.
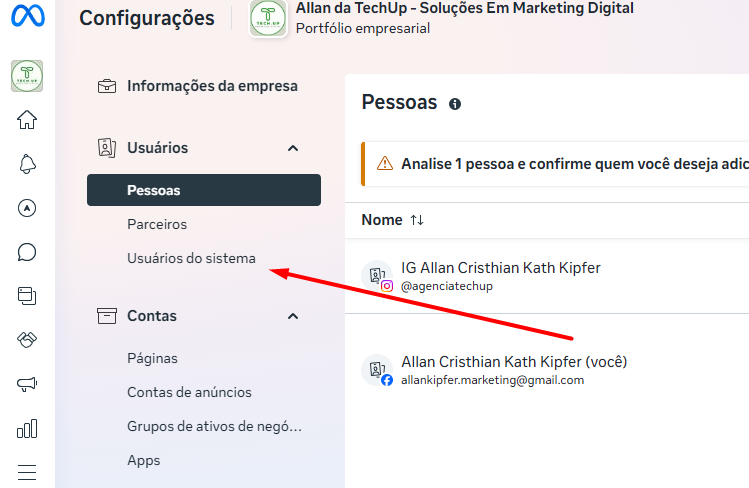
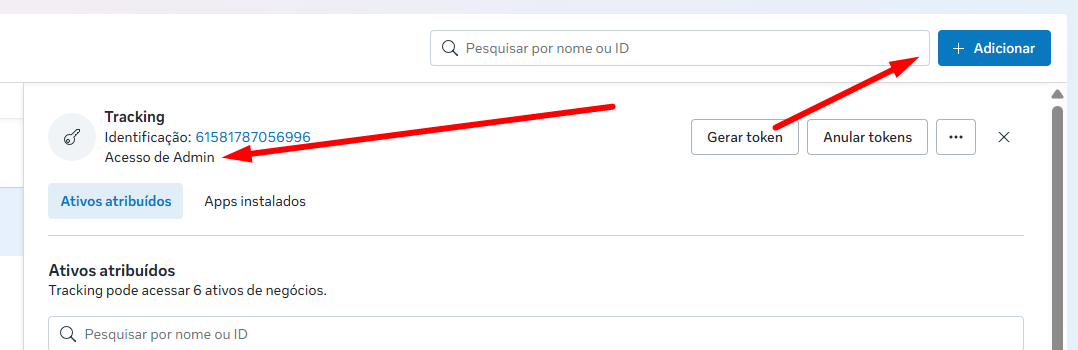
Now click on System Users. See image 12.
Image 12
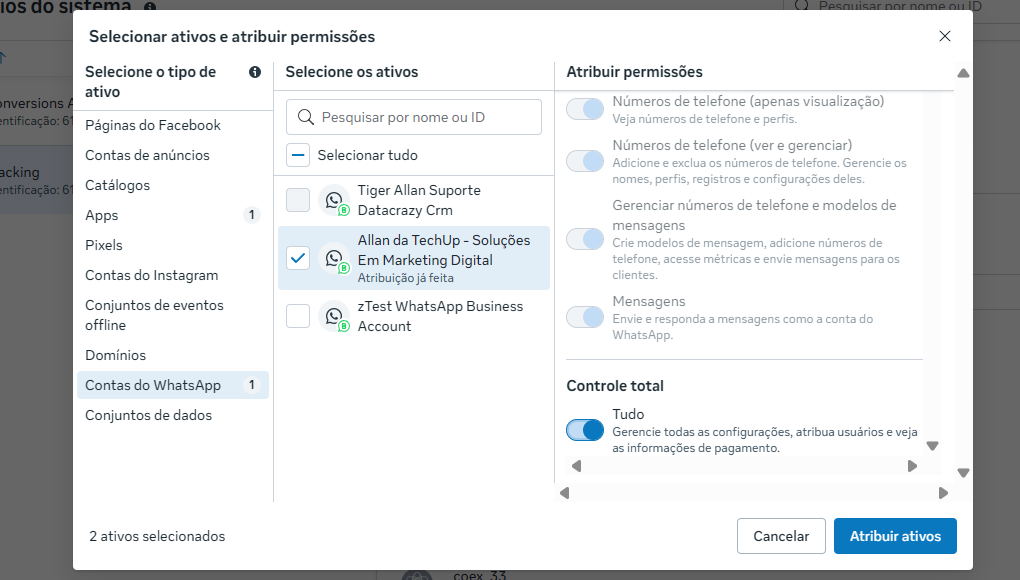
Now let’s assign assets to the app. See image 13.
Image 13
If you don’t have a user listed (see image 15) create one, always make sure it’s Admin Access, click Add, set the type to ADMIN, and use the name Admin. Click on 'Create system user' or 'Criar usuário de sistema'. See image 14.
Image 14
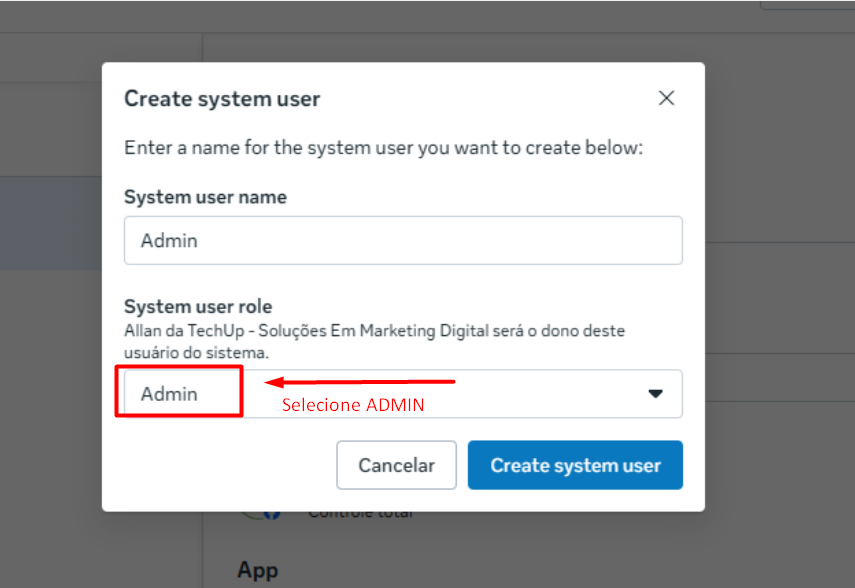
Image 15
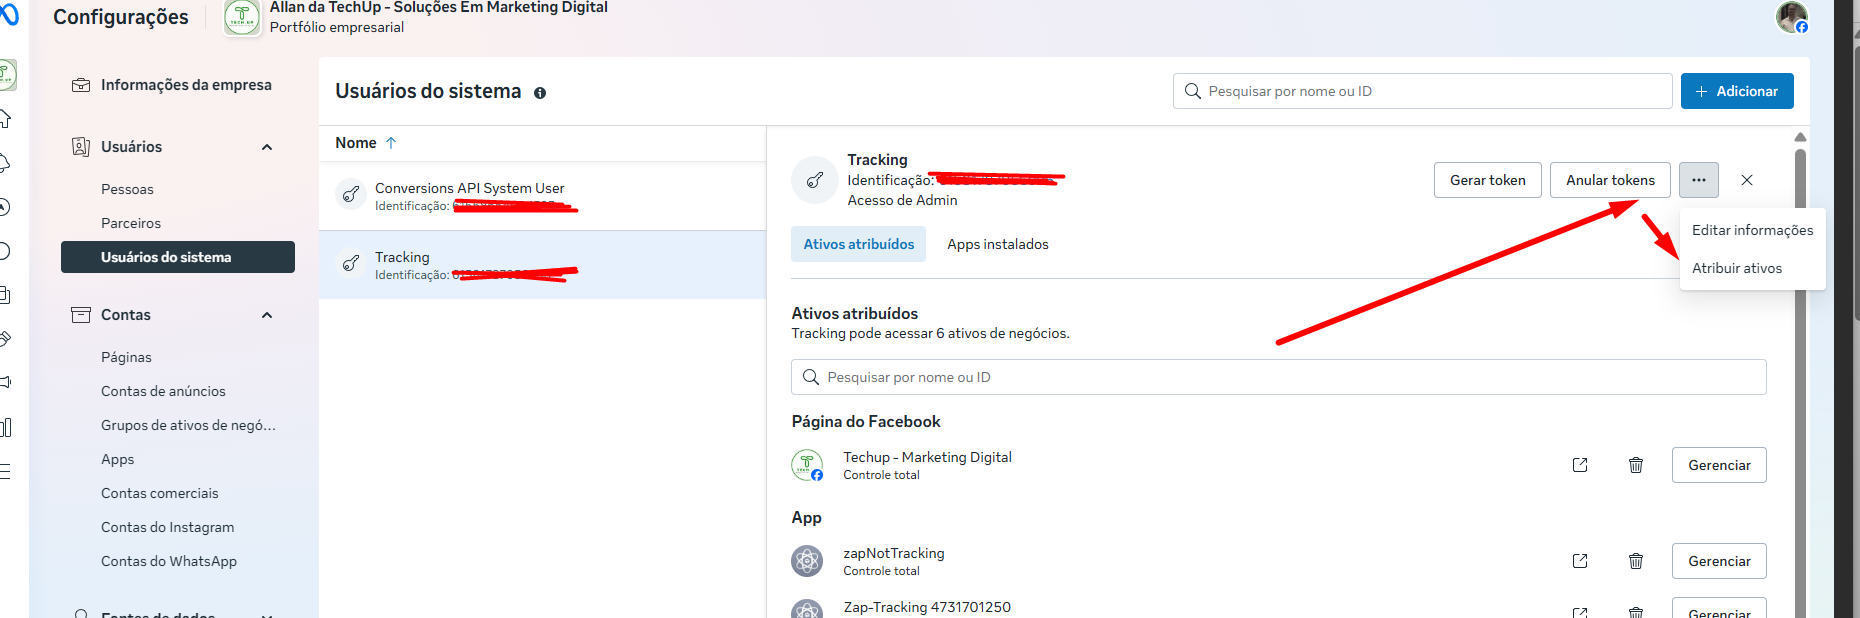
Click on Apps, select the app created, and give it Full Control, now go to WhatsApp Accounts, and do the same procedure, this time selecting the WhatsApp account that you will use (created previously), give the permissions with Full Control and click on Assign Assets. See Image 16.
Image 16
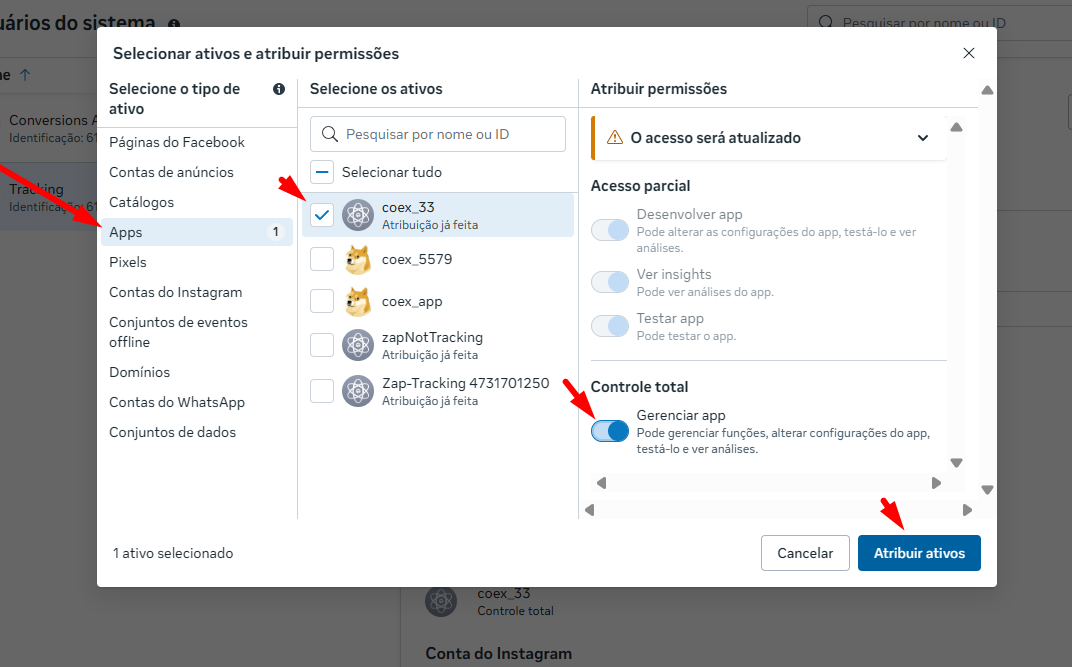
Image 17
Click Finish on the next window that appears, showing success when assigning assets.
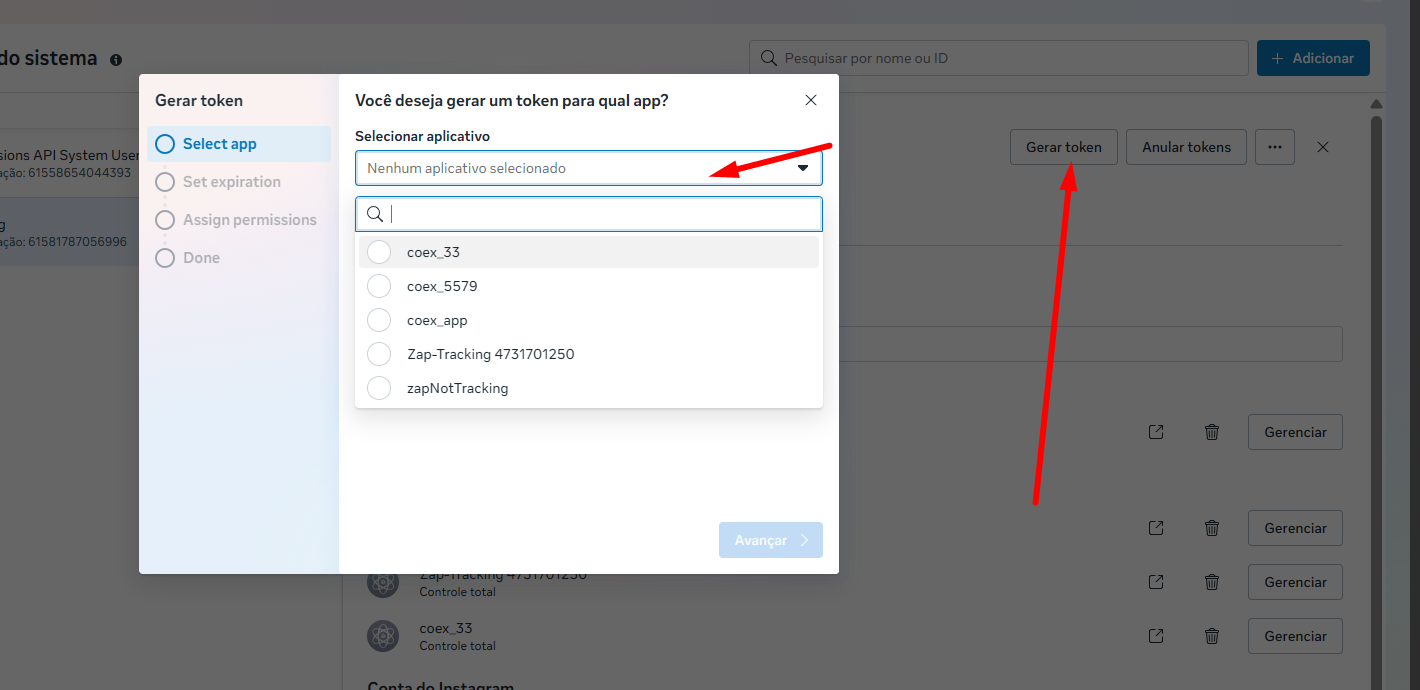
Now let’s generate the user token as ADMIN. To know if your user is of the ADMIN type, just look at its label below the numeric ID. See image 13
Select the APP, continue, choose NEVER so the token never expires. Continue. See image 18.
Image 18
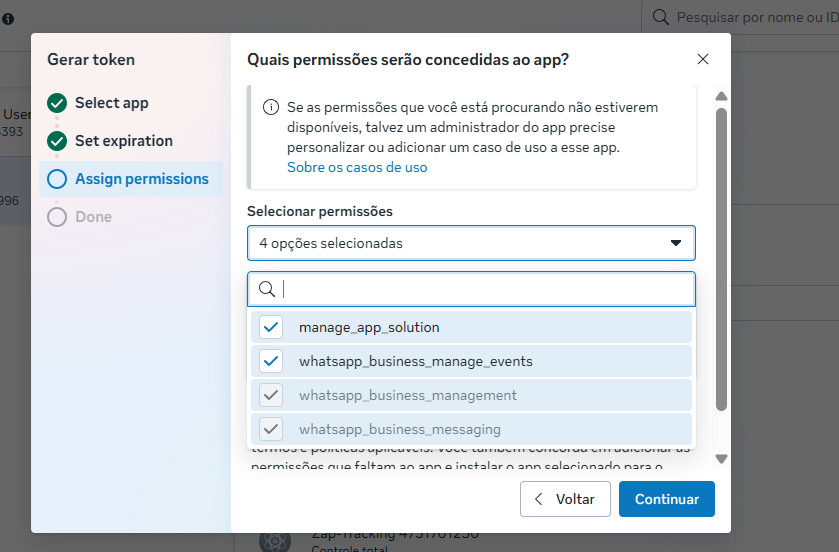
In the next step, check all the permissions listed for you, and click on generate token. see image 19
Image 19
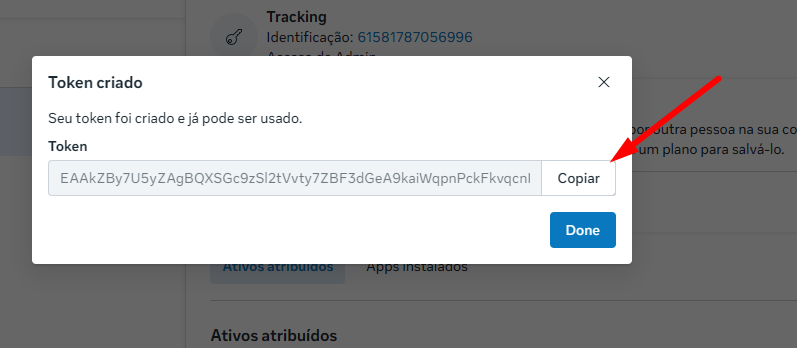
It might ask you to verify your account, click on verify and follow the steps. Enter the confirmation number you got in your email in the text box and confirm. See image 20. If it doesn’t ask, the generated token will already appear, copy it using the copy option and save it in a safe place. See image 21. Any extra or missing character will make it invalid for our use.
Image 20
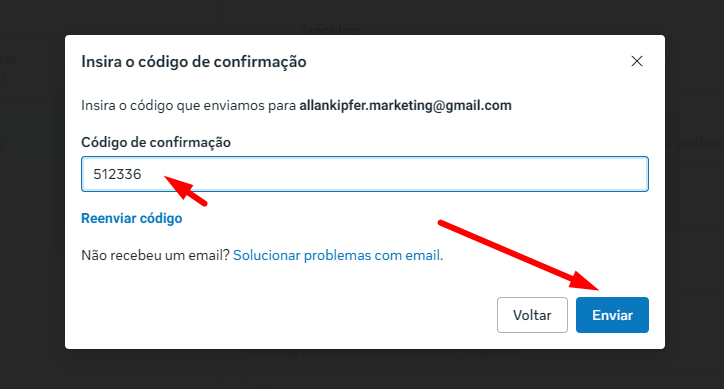
Image 21
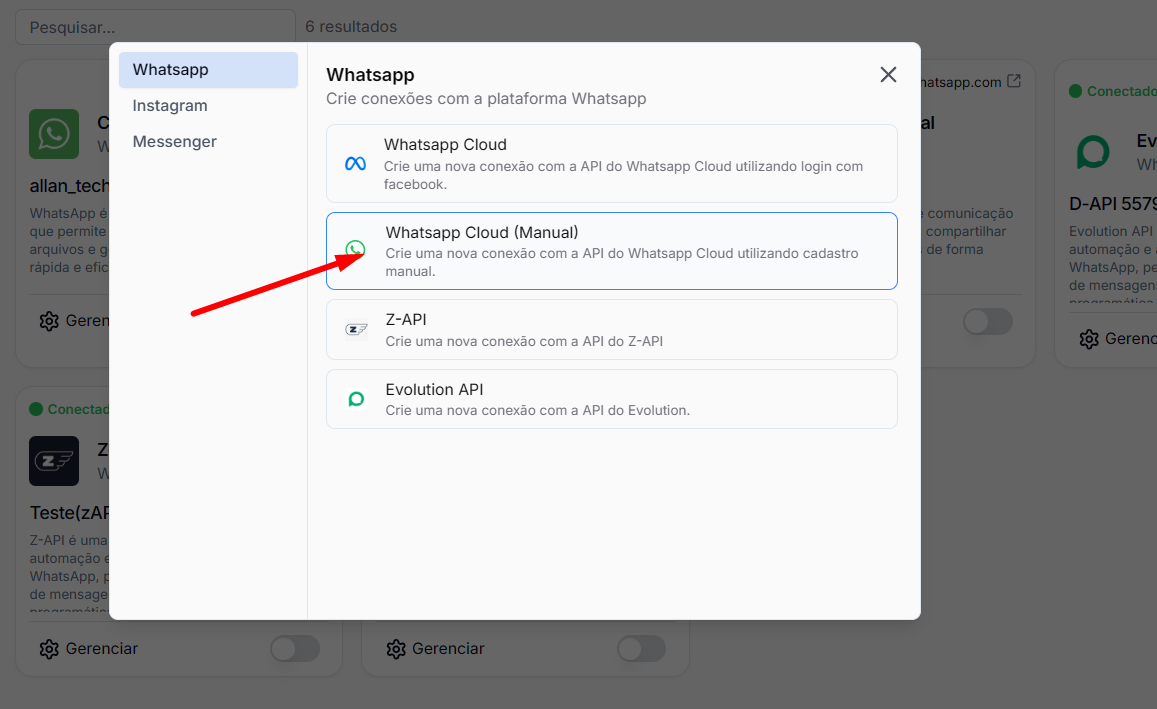
With the generated token, let's open the CRM at this link. Create a new Manual WhatsApp Cloud connection. See Image 22.
Image 22
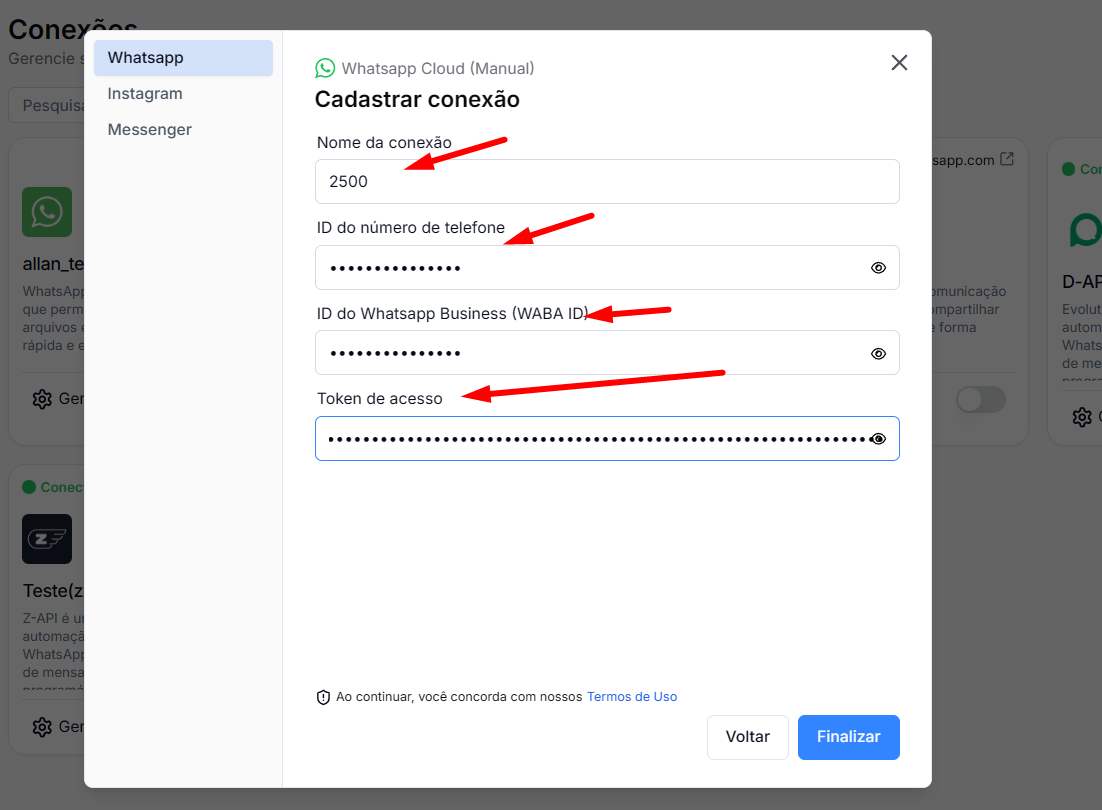
Fill in Connection name, phone number ID, also the WhatsApp Business account number ID (waba ID) and the token generated earlier. With everything filled out, click Finish further below. See Image 23.
Image 23
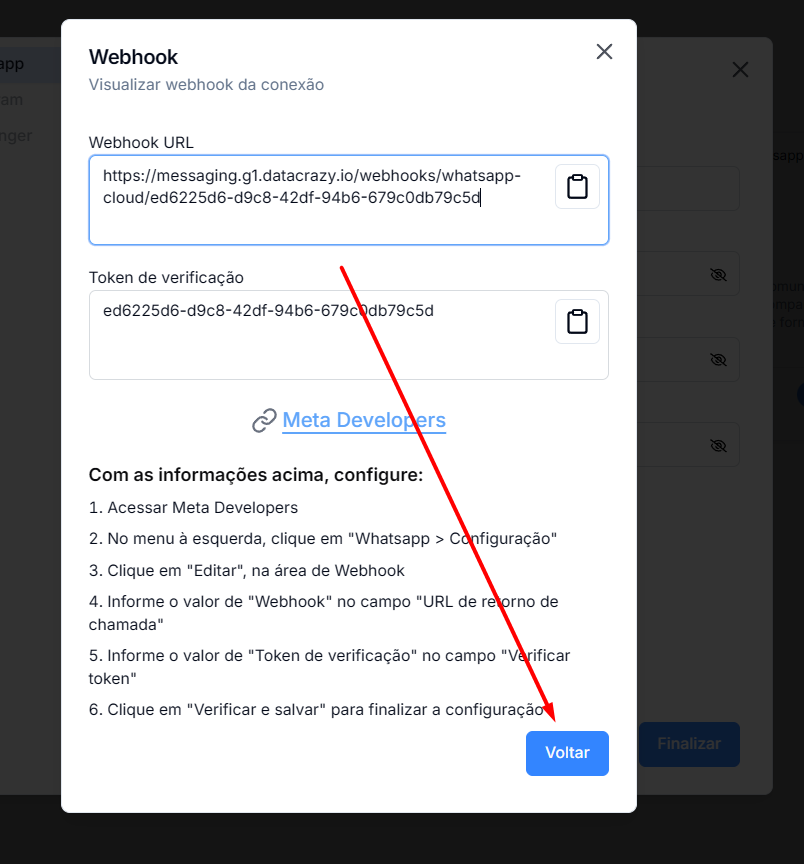
Copy and save both Webhook URL and Verification Token and keep them in a safe place. With that saved, let's go to the page opened in developers, where we have to fill in the webhook information. See image 24.
Image 24
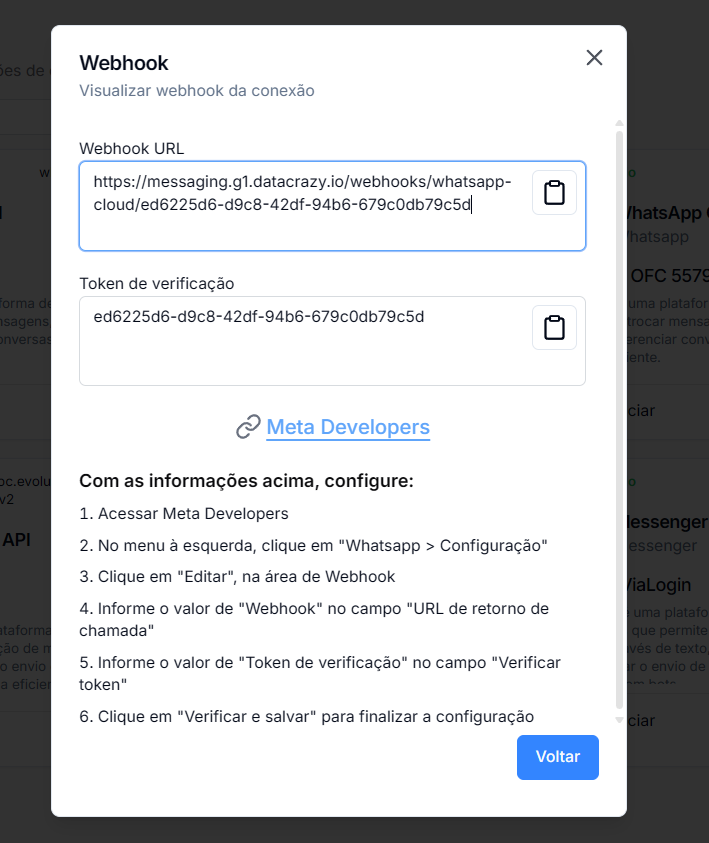
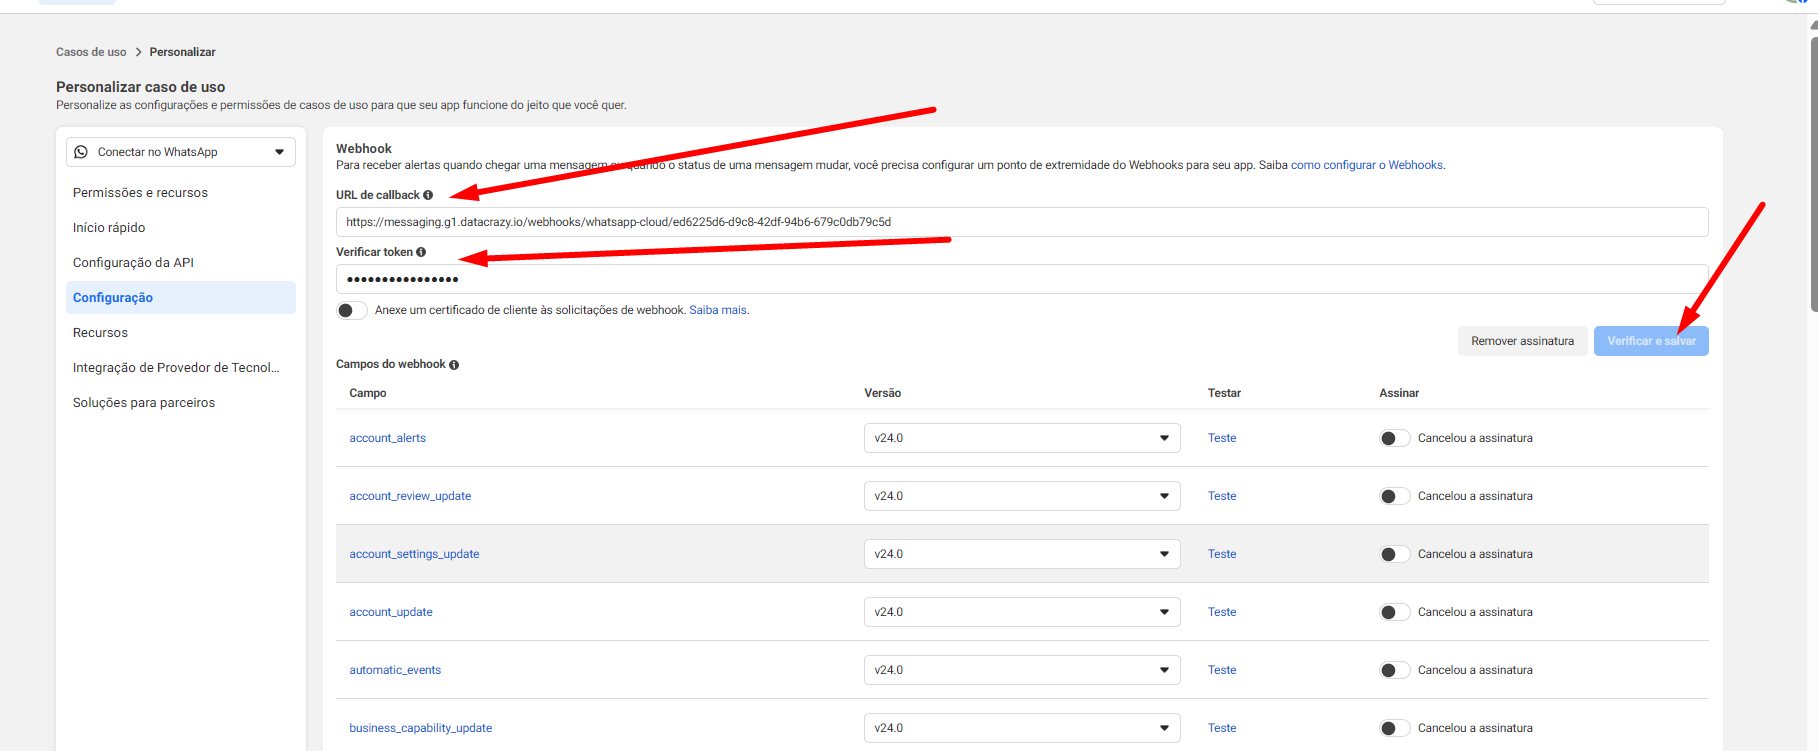
Now, copy and paste the webhook url and the previously saved verification token. Click on Verficar e Salvar. See image 25 above.
Image 25
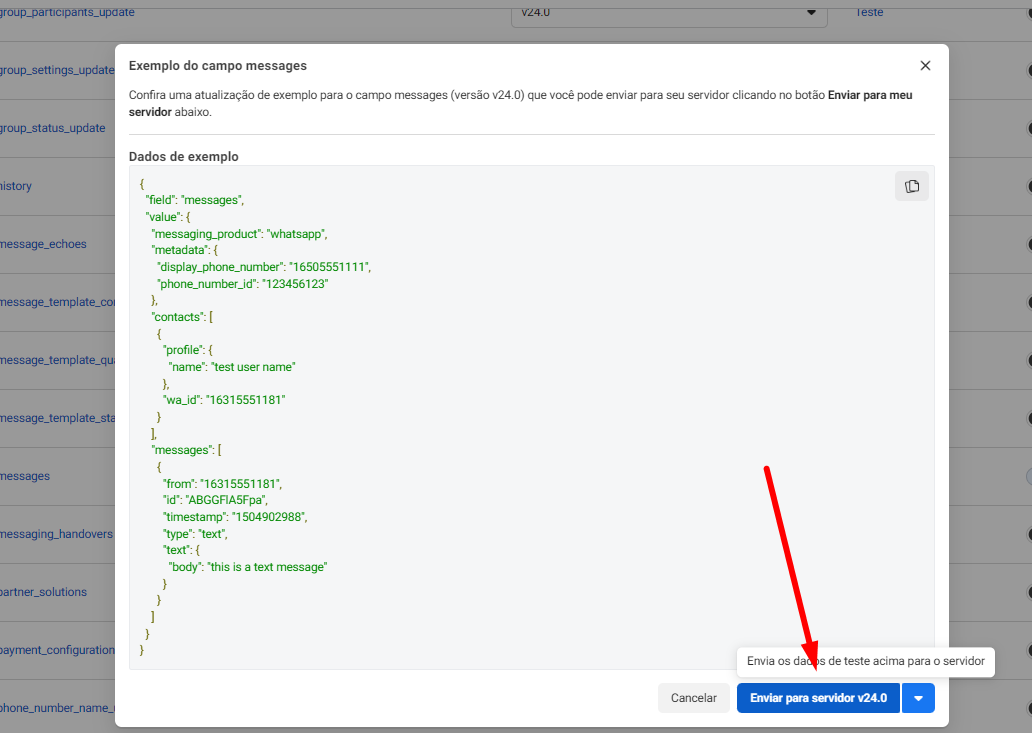
Wait for it to save, and then refresh the page. Scroll further down, look for messages. Turn it on with the button and click on test. Send the test event by clicking on enviar para o servidor.. See Image 26 and 27.
Image 26
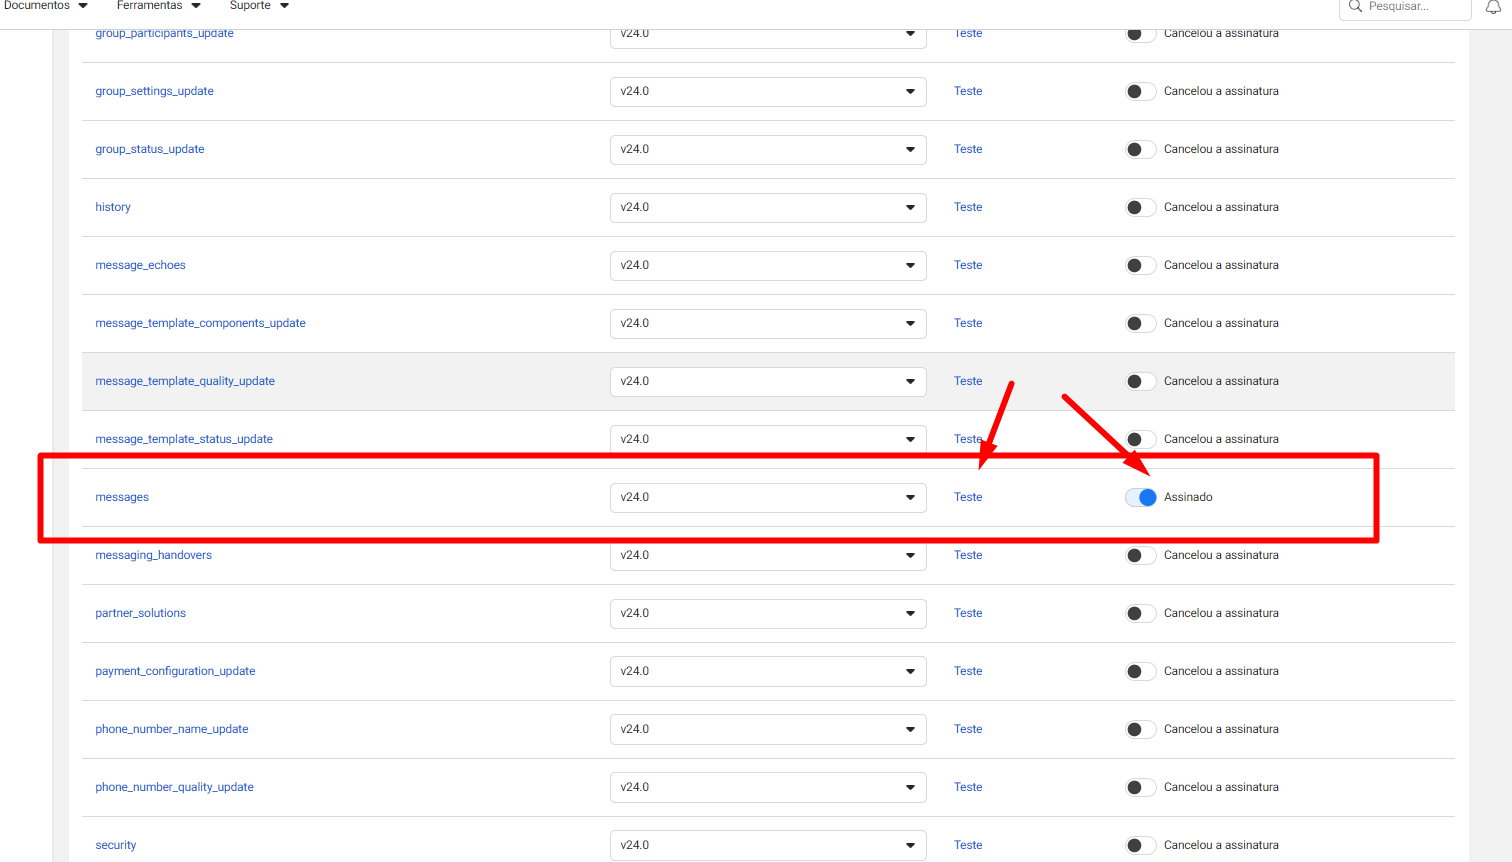
Image 27
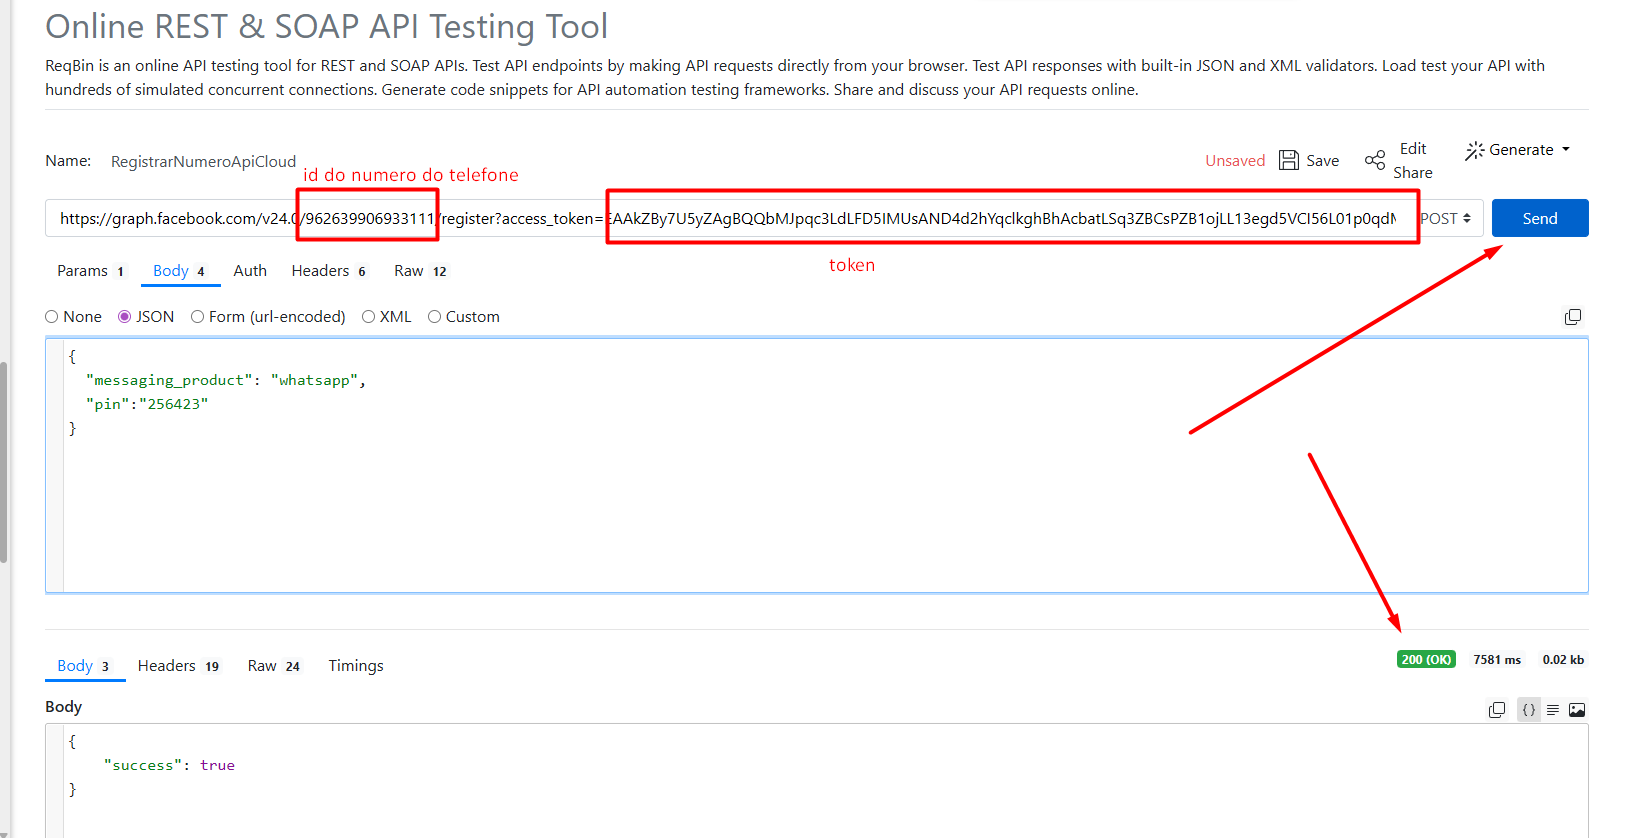
now, go to this link, enter as indicated the phone number id, the 6‑digit pin (if you don’t have one, enter one and it will be saved with it), and the token, and click on send. If the response is in green and (OK), it worked. See image 28. (Showing success in the bottom right corner)
image 28
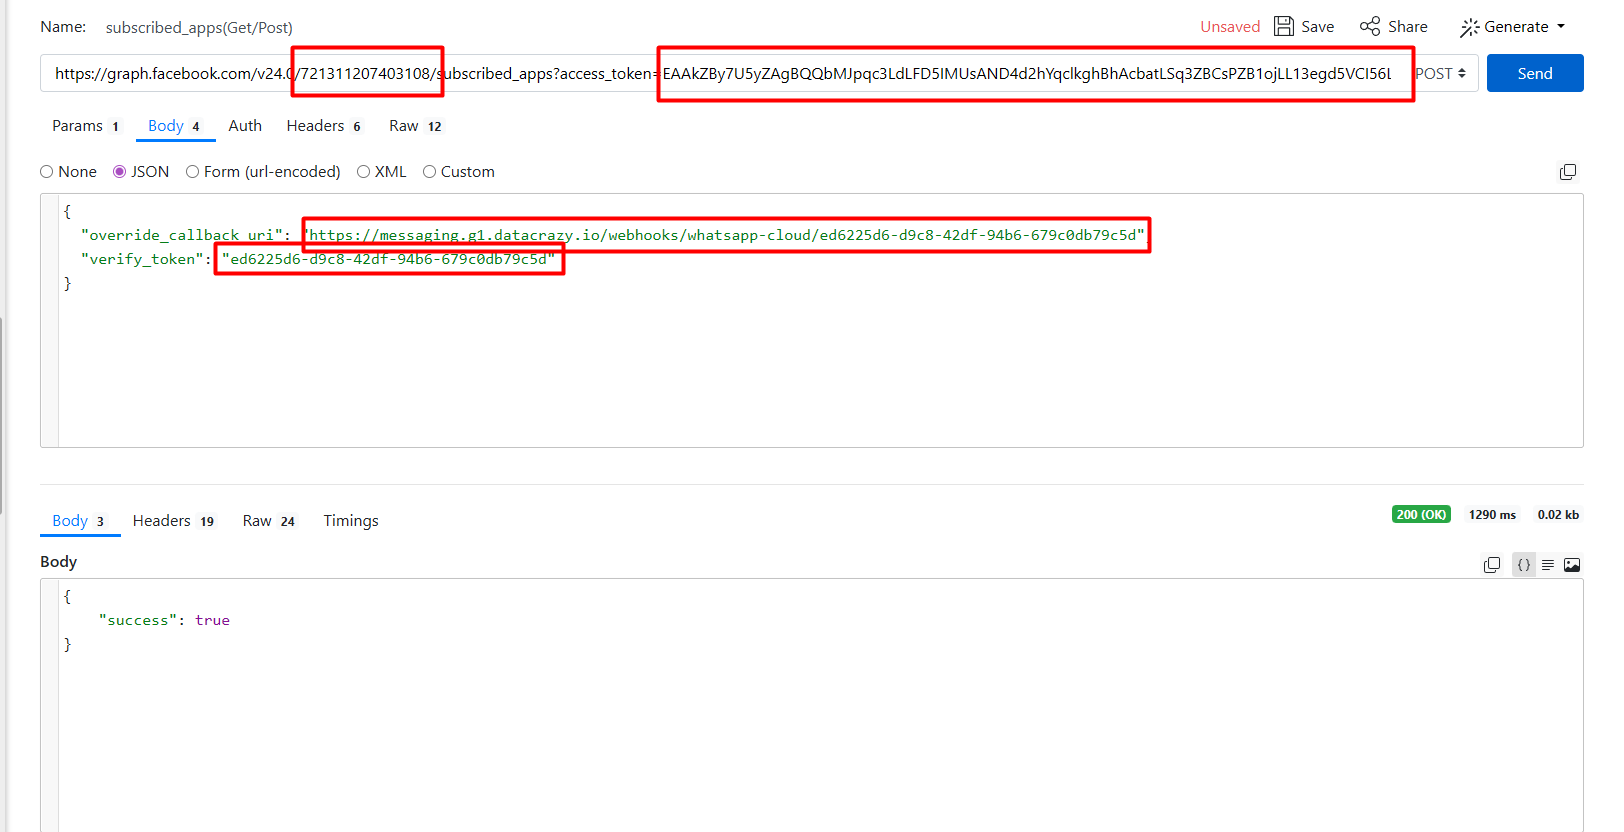
Now we need to make one more API call, similar to the tenth one. Click this link Fill in the WhatsApp Business account id (wabaID), and the token saved earlier.
Also fill in where it says url_webhook with the webhook URL copied earlier. Do the same for the verification token, copying it from earlier. See image 25
Check the highlighted spots where you need to make adjustments, then click send. It should return success 200 (OK) in green, similar to the previous one.
Image 29
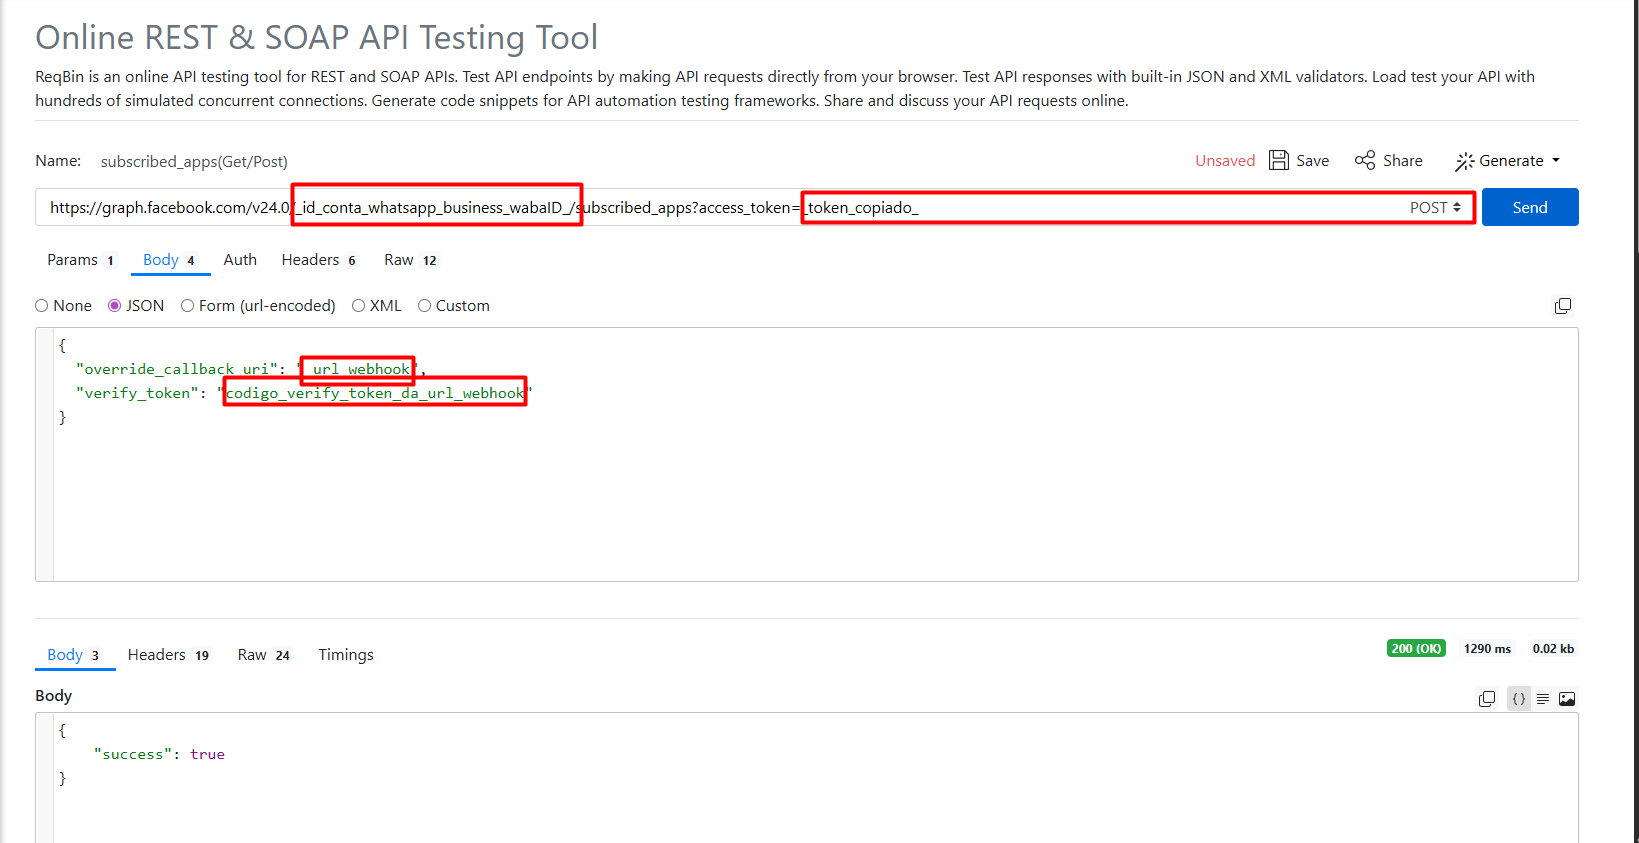
image 30
Now it's almost ready. Go back to the CRM on the open connection screen. If it’s still open like this, click back, and then finish. Done, your connection is set up. See image 31.
Image 31
From your cell phone, send a “hi” to this number connected to the CRM. You should receive it normally; once you receive it, also test sending, reply with a “hi” in multi-service (Live chat).
Your connection is set up, tested, and ready to use.
Now all that’s left is to create the templates if you’re going to need them.
